Next Release - What's coming?
Release Notes
6.4.28 Release Notes - July 2026
6.4.27 Release Notes - May 2026
v6.4.26.1 Release Notes - May 2026 - Minor Release Notification
v6.4.26 Release Notes - April 2026
v6.4.25.1 Release Notes - March 2026 - Minor Release Notification
v6.4.25 Release Notes - February 2026
v6.4.24 Release Notes - January 2026
v6.4.23 Release Notes - December 2025
v6.4.22 Release Notes - October 2025
v6.4.21 September - Minor Release - Release Notes
v6.4.21 Release Notes - September 2025
v6.4.20 Release Notes - August 2025
v6.4.19 Release Notes - July 2025
v6.4.18 Release Notes - 4th March 2025
v6.4.17 Release Notes - 3rd December 2024
v6.4.16 Release Notes - 4th October 2024
v6.4.15 Release Notes - 6th September 2024
v6.4.14 Release Notes - 9th August 2024
v6.4.12 Release Notes - 5th July 2024
v6.4.11 Release Notes - 24th May 2024
Upcoming in the Next Release - Subject to Change - v6.4.21 September
Upcoming in the Next Release - Subject to Change - v6.4.22
Upcoming in the Next Release - Subject to Change - v6.4.28
V6.4.19 Roadmap Upcoming Features (subject to change)
V6.4.18 Roadmap Upcoming Features (subject to change)
V6.4.17 Roadmap Upcoming Features (subject to change)
V6.4.16 Roadmap Upcoming Features (subject to change) 4th October
V6.4.15 Roadmap Upcoming Features (subject to change) 6th September
V6.4.14 Roadmap Upcoming Features (subject to change) 9th August
V6.4.12 Roadmap Upcoming Features (subject to change) 5th July
V6.4.11 Roadmap Upcoming Features (subject to change) 24th May
v6.4.10 Release Notes - 12th April 2024
v6.4.9 Release Notes - 1st March 2024
v6.4.8 Release Notes - 19th January 2024
v6.4.7 Release Notes - 24th November 2023
v6.4.6 Release Notes - 13th October 2023
v6.4.5 Release Notes - 1st September 2023
v6.4.4 Release Notes - 21st July 2023
v6.4.3 Release Notes - 9th June 2023
v6.4.2 Release Notes - 5th April 2023
v6.4.1 Release Notes - 31st March 2023
v6.4.0 Release Notes - 3rd March 2023
v6.3.3 Release Notes - 3rd February 2023
6.3.2 Release Notes - 16th December 2022
v6.3.1.1 (6.3.1.420) - 24th November 2022
v6.3.1 Release Notes - 14th November 2022
Warranted Environment Specification
Minor Release 6.4.28.1
On-Demand Webinars
Navigation
System Admin
Administrator
Reference Data
Email Setup
Setting up Emails
Registering the App
Assigning Microsoft 365 Licences
Configure System Settings for Emails
OneAdvanced Identity (Single Sign-On)
Introduction to Single Sign-On
Syncing a User to Advanced Identity
Authentication Providers (for Reference Only)
Logging in Using SSO for the First Time
Logging in Using MFA
Creating a Business Unit
How to Create a Provider
System Settings for Copying and Ending Staff Contracts
How to Add Public Holidays
Setting up the Address Gazetteer
Integrating Maps for Rostering Travel Time and Distance
Enabling and Disabling Business Modules
Tracing Performance Issues
List of Scheduled Jobs
How to Set up FAQs
System Users
Creating a System User
Assigning System User Personas
Adding Security Profiles to a System User
Removing Security Profiles from a System User
Assigning Home Screens
Deactivating a System User
Removing a System User from a Team
Access to Authorise Forms
Teams
Creating a Team
Change Team Visibility
Adding Team Members
Adding Team Security Profiles
Ending a Team Membership
Moving a Team to a Different Business Unit
Team Codes
Personas
Advanced Search
Views and Dashboards
Introduction to System Dashboards
Creating a System Dashboard
Creating a System Chart
Aggregated Data in User Charts
Adding Widgets to a System Dashboard
Creating a Home Screen
Allocating a Home Screen
Changing the Owning User of an Advanced Search
Tribepad and Access Integration
Nourish Integration
CM2000 Export
Rostering
Configuring Rostering
Adding Availability Types
Editing Availability Types
Adding Transport Types
Configuring the Delete Booking Dialog
Adding a Booking Deletion Reason
Scheduling Setup
Introduction to Scheduling Setup
Scheduling Setup: Bookings
Scheduling Setup: Bookings Validation
Scheduling Setup: Diary Bookings Validation
Scheduling Setup: Contract Hours Validation
Scheduling Setup: Runs Validation
Scheduling Setup: Wallchart
Scheduling Setup: Bradford Factor Report
Scheduling Setup: Capacity Planning
Scheduling Setup: Employment Contract Continuous Service
Booking Types
Introduction to Booking Type Class
Adding Booking Types: Booking (To Location)
Adding Booking Types: Booking (To Internal Care Activity)
Adding Booking Types: Booking (To External Care Activity)
Adding Booking Types: Booking (To Internal Non-Care Booking)
Adding Booking Types: Booking (Service User Non-Care Booking)
Booking Type Clash Actions
Linking Booking Types to Providers
Using the Provider Schedule
Introducing the Provider Schedule
Adding a Schedule Booking
Setting Occurrence Against Bookings
Validations When Creating a Schedule Booking
Managing Schedule Bookings
Using the Provider Diary
Introducing the Provider Diary
Adding a Diary Booking
Validations When Creating a Diary Booking
Managing Diary Bookings
Scheduling Runs
Publishing Bookings
Offer Bookings
Time and Attendance
Introduction to Time and Attendance
Configuring Time and Attendance Rules
Matching Bookings and Events
Unmatching Events
People
About Me
Care Planning
Introduction to Care Planning
Creating a Care Plan
Adding and Completing Assessment Forms
Adding Attachments Against Care Plans
Adding a Person Risk Plan
Recording Care Preferences
Recording and Managing Regular Care
Problems and Notes
Bookings
Creating and Managing Care Plan Documents
Creating a Person Discharge
Daily Care
Bed Management
Introduction to Bed Management
Creating Sub Locations
Adding Rooms to Sub Locations
Adding Beds to Rooms
Adding a Bed Contract Type
Allocating a Bed to a Person Record
Mark Bed as Unavailable
eMAR for Domiciliary Care
Introduction to eMAR for Domiciliary Care
MAR Schedules
Medication Periods
Medication Diary
eMAR in the Mobile App
MAR Chart
Adding a Person Record
Person Search
Enforce Searches Before Creating Person Records
Managing Existing Person Record
Using Person Tracking for Prospects
Creating Person Specific Training
Adding a Correspondence
Adding a Correspondence via Person Record
Preferences
Compatibility
Charting Review, Sign Off and Export
Finance
Person Contract Services
Finance Codes
Configuring Contract Services
Using Contract Services
Person Contract Service
Adding a Person Contract
Ending a Person Contract
Adding a Contract Scheme
Adding a Service
Adding a Services Detail
VAT Codes Setup
Adding Person Contract Service End Reason Rules
Adding Person Absence Reason Rules
Invoicing and Billing
Finance Invoice Batch Setup
Using Finance Invoice Generation
Finance Extract Batch Setup
Using Finance Extract Batches
Finance Invoice Processing
Charge Apportionments
Payments Against Invoices
Personal Money Account
Using the Finance Module
Providers
Finance Scheduled Jobs
Person Absences
Accounting Periods
Employee Management
Applicants
Adding an Applicant
Schedule Availability
Creating Transport Availability
Adding a New Role Application
Training
Staff Training Items Setup
Training Requirement Setup
Training Course Setup
Adding Training to a System User
Employment
Configuring Employment Contracts Reference Data
Creating Employment Contracts
Ending Employment Contracts
Suspending Employment Contracts
Move to New Employment Contract
End and Create New Employment Contract
Creating an Open-ended Absence
Ending an Open-ended Absence
Removing an Open-ended Absence
Adding Worker IDs
Annual Leave
Payroll
How to Set Up Timeband Sets
How to Set Up a Payroll Batch
How to Set Up a Master Pay Arrangement
How to Confirm Bookings on the Provider Diary
How to View Output of Payroll Batches
How to Download Gross Pay Advice(s)
How to Send Gross Pay Advice(s)
Setting Up Travel Reimbursements
How to use Mail Merge to Download Gross Pay Advice(s)
Payroll Exports
Forms Management and Workflows
Pathways
Introduction to Pathways
Configuring the Pathway Task Catalogue Elements
Configuring the Pathway Setup
Exporting and Importing Pathways
Adding a Pathway
Using Pathways
Data Management
Data Migration
Data Import Procedure Overview
Data Migration Maps
Data Migration Packages
Data Import File
Data Import Processes
Using the Data Import Tool
File Destruction
Duplicate Detection
Creating Duplicate Detection Rules
Viewing Duplicate Records
Merging Duplicate Records
Viewing Merged Records
Unmerging Merged Records
APIs
Mobile App
Web App Configuration
Care Provider Settings
Care Periods
Enabling the Mobile Business Module
Add Mobile User Security Profile to System User
Marking Alert and Hazard Types as Key Risk
Marking Diagnosis as Key Risk
Mobile App Configuration
Using the Mobile App
Bookings With Multiple People (eg BTC2/3 - Supported Living)
Service Endpoint Setup in the Mobile App - Carousel
FAQ
FAQ Glossary of Terms
FAQ How do Care Cloud Finance API’s work?
FAQ - Why can't we see all Residents in the Mobile App?
FAQ - What is the timeout of the Product?
FAQ - Why am I seeing an error message in the Mobile App about option-set data not available?
Why can i see my Booking in the Mobile App but not the Care Plan or Risks?
FAQ - Why is the Employee Type field important when creating a System User record?
FAQ What can be uploaded to Care Cloud?
FAQ What is the Mobile App Timeout?
FAQ - How to Bulk Update a Multi Select Field
Why can i see bookings online but not offline in the Mobile App?
FAQ - Why do i have an error connecting the APIs?
FAQ - Why do Medications show as "Not Recorded" or "No Visit"
FAQ How do i show the Recent Injury Icon in the Mobile Residential Care Resident Dashboard?
FAQ How do i show and End of Life Icon in the Mobile Residential Care Resident Dashboard?
FAQ - How to add a URL to an Invoice to link to Advanced Financials
FAQ How do i control which Care can be given in Ad-Hoc Mobile Tasks?
FAQ - What is the difference between "Move to new Contract" and "End and Create New" for System User Contracts?
FAQ - How is the payment for Annual Leave Calculated?
FAQ - Why Can't I Complete an DNAR Record
- All categories
- System Admin
- Administrator
- Email Setup
- Registering the App
Registering the App

The first step of setting up your emails is to register the app.
- Search for App registrations on the Azure Portal home page.
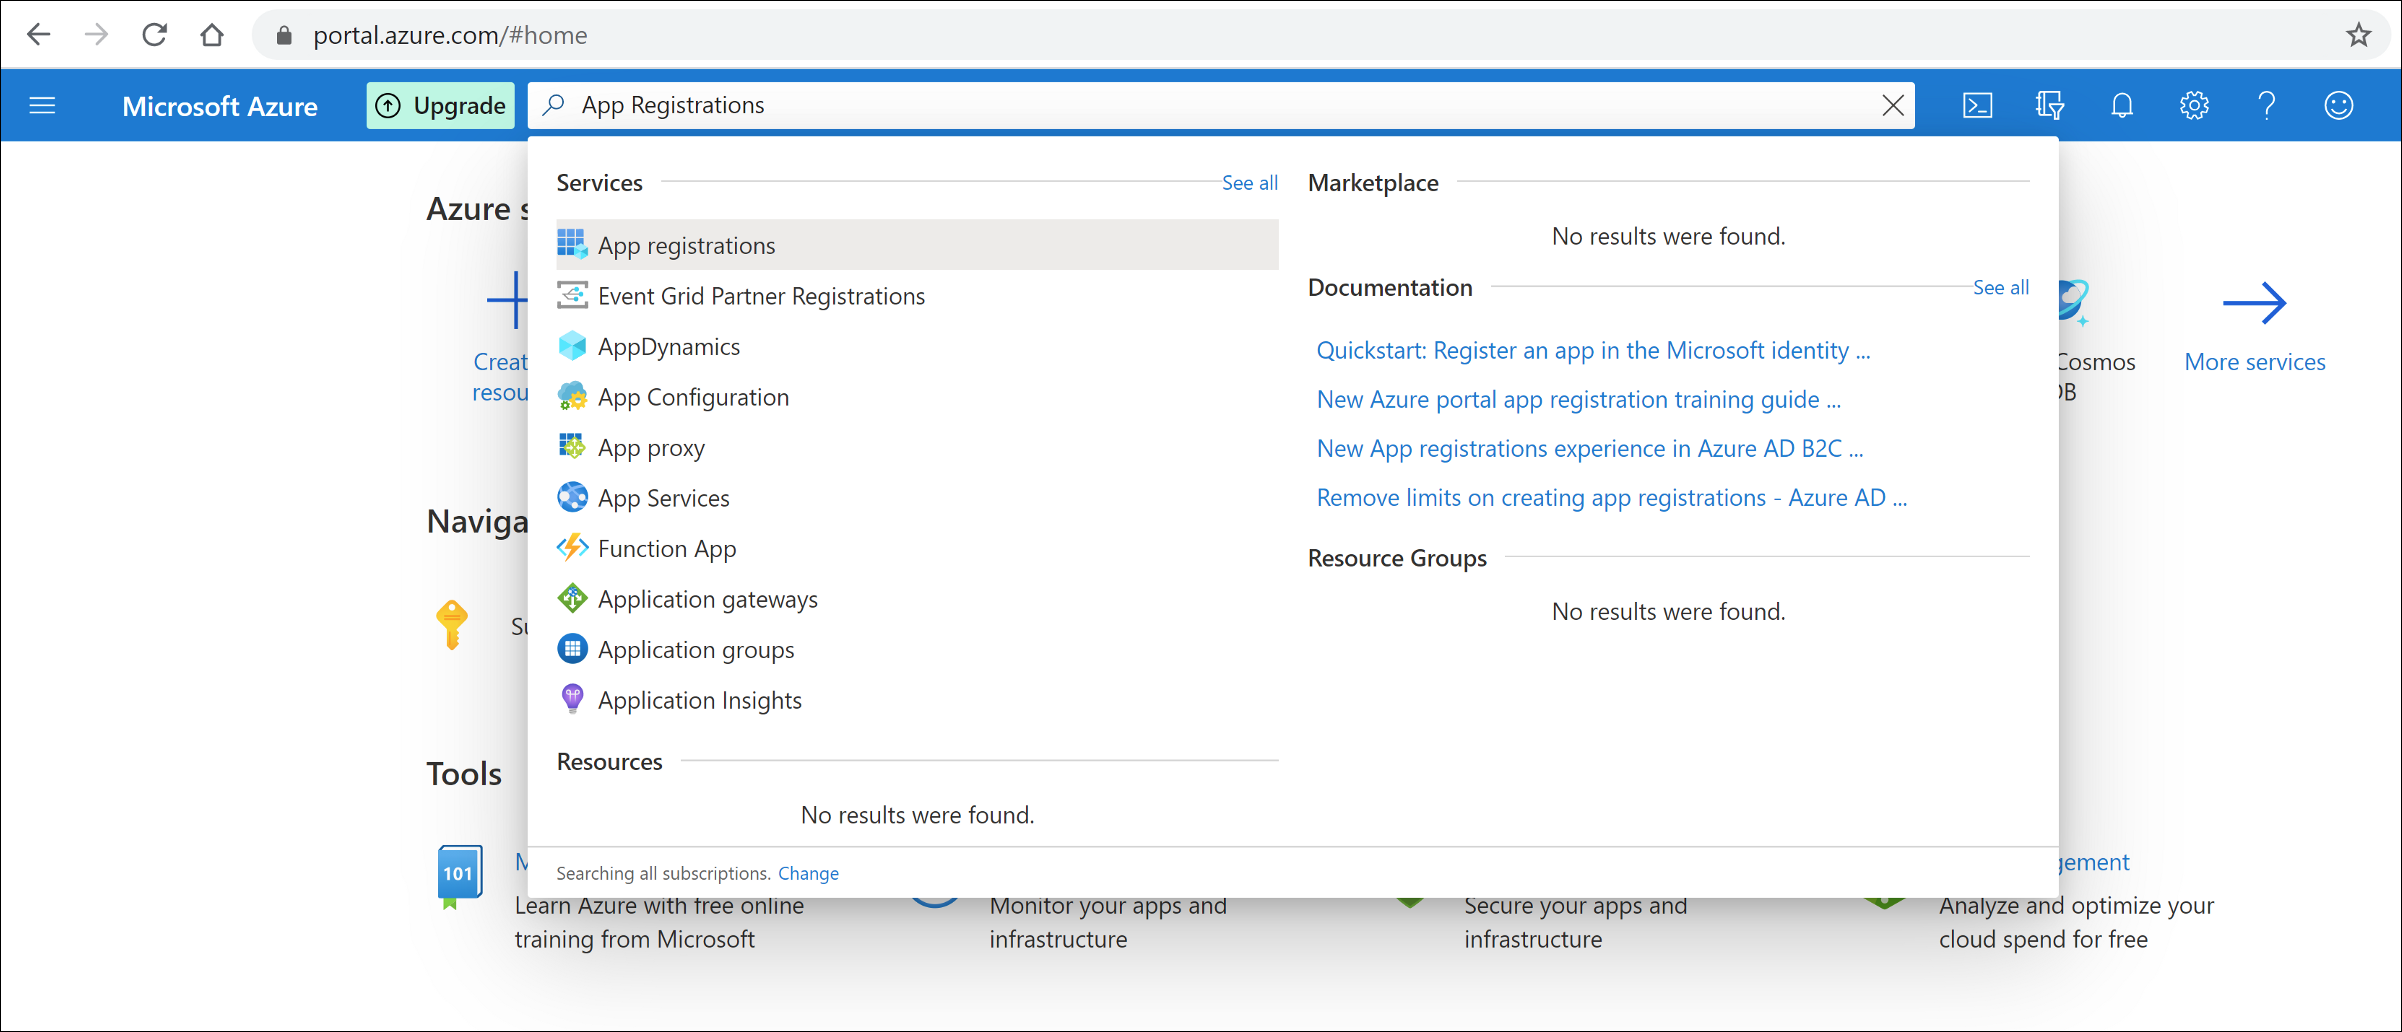
- Select the App registrations link.
The 'App registrations' page is displayed:
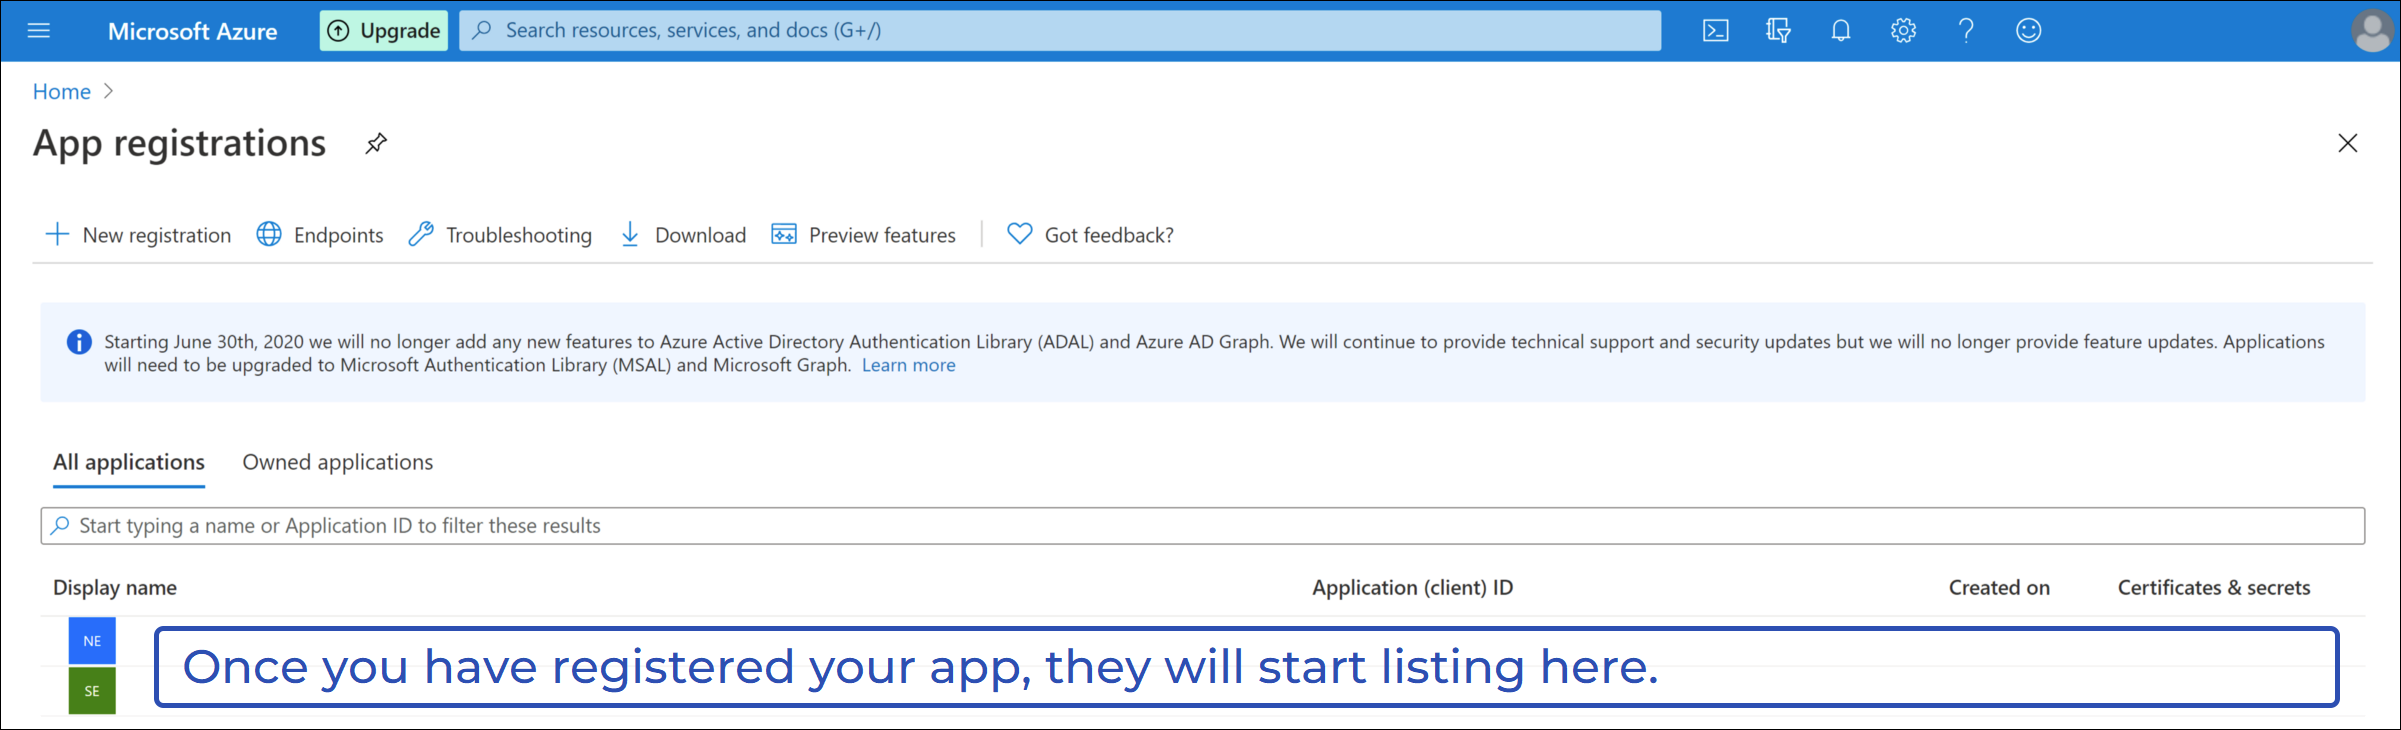
- Select + New registration on the top left of the page.
The 'Register an application' page is displayed:
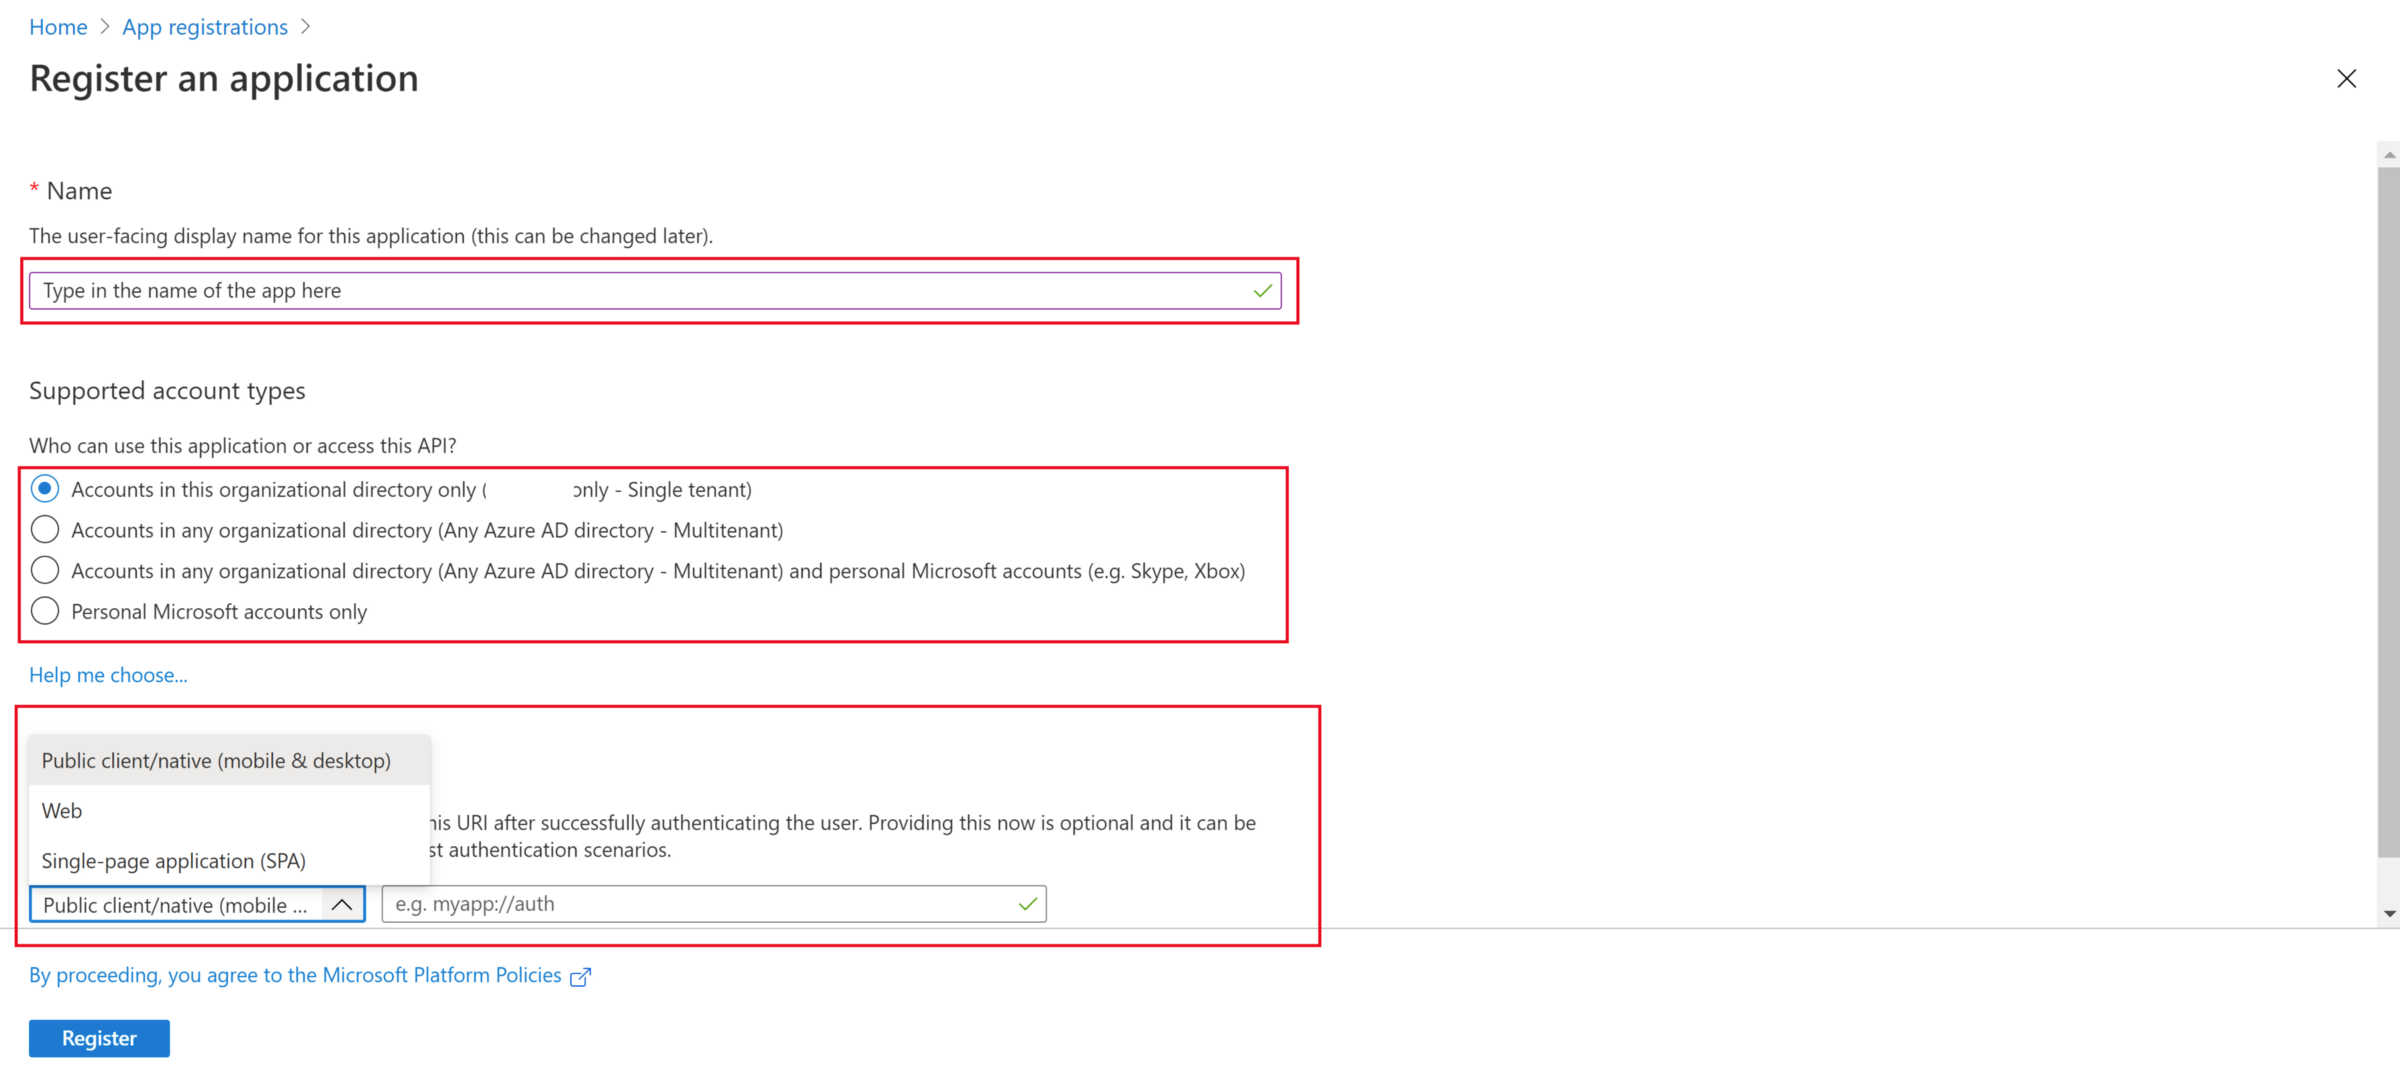
- Provide a Name for application
- Select the Web option and enter the application URL.
In the following example, we've used localhost:
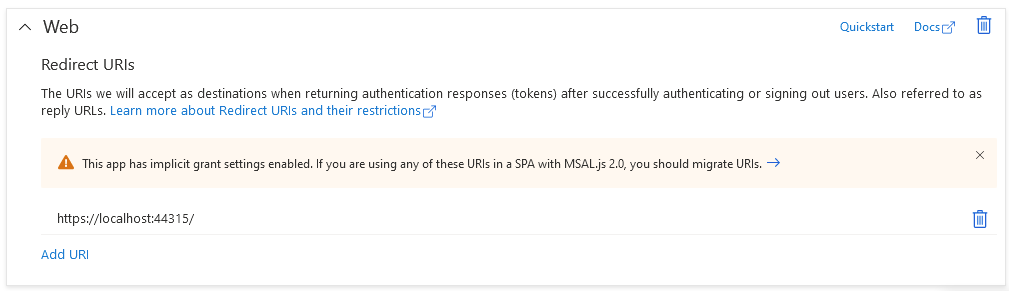
- Select the Register button.
The app will be registered and you will be taken to the following page:
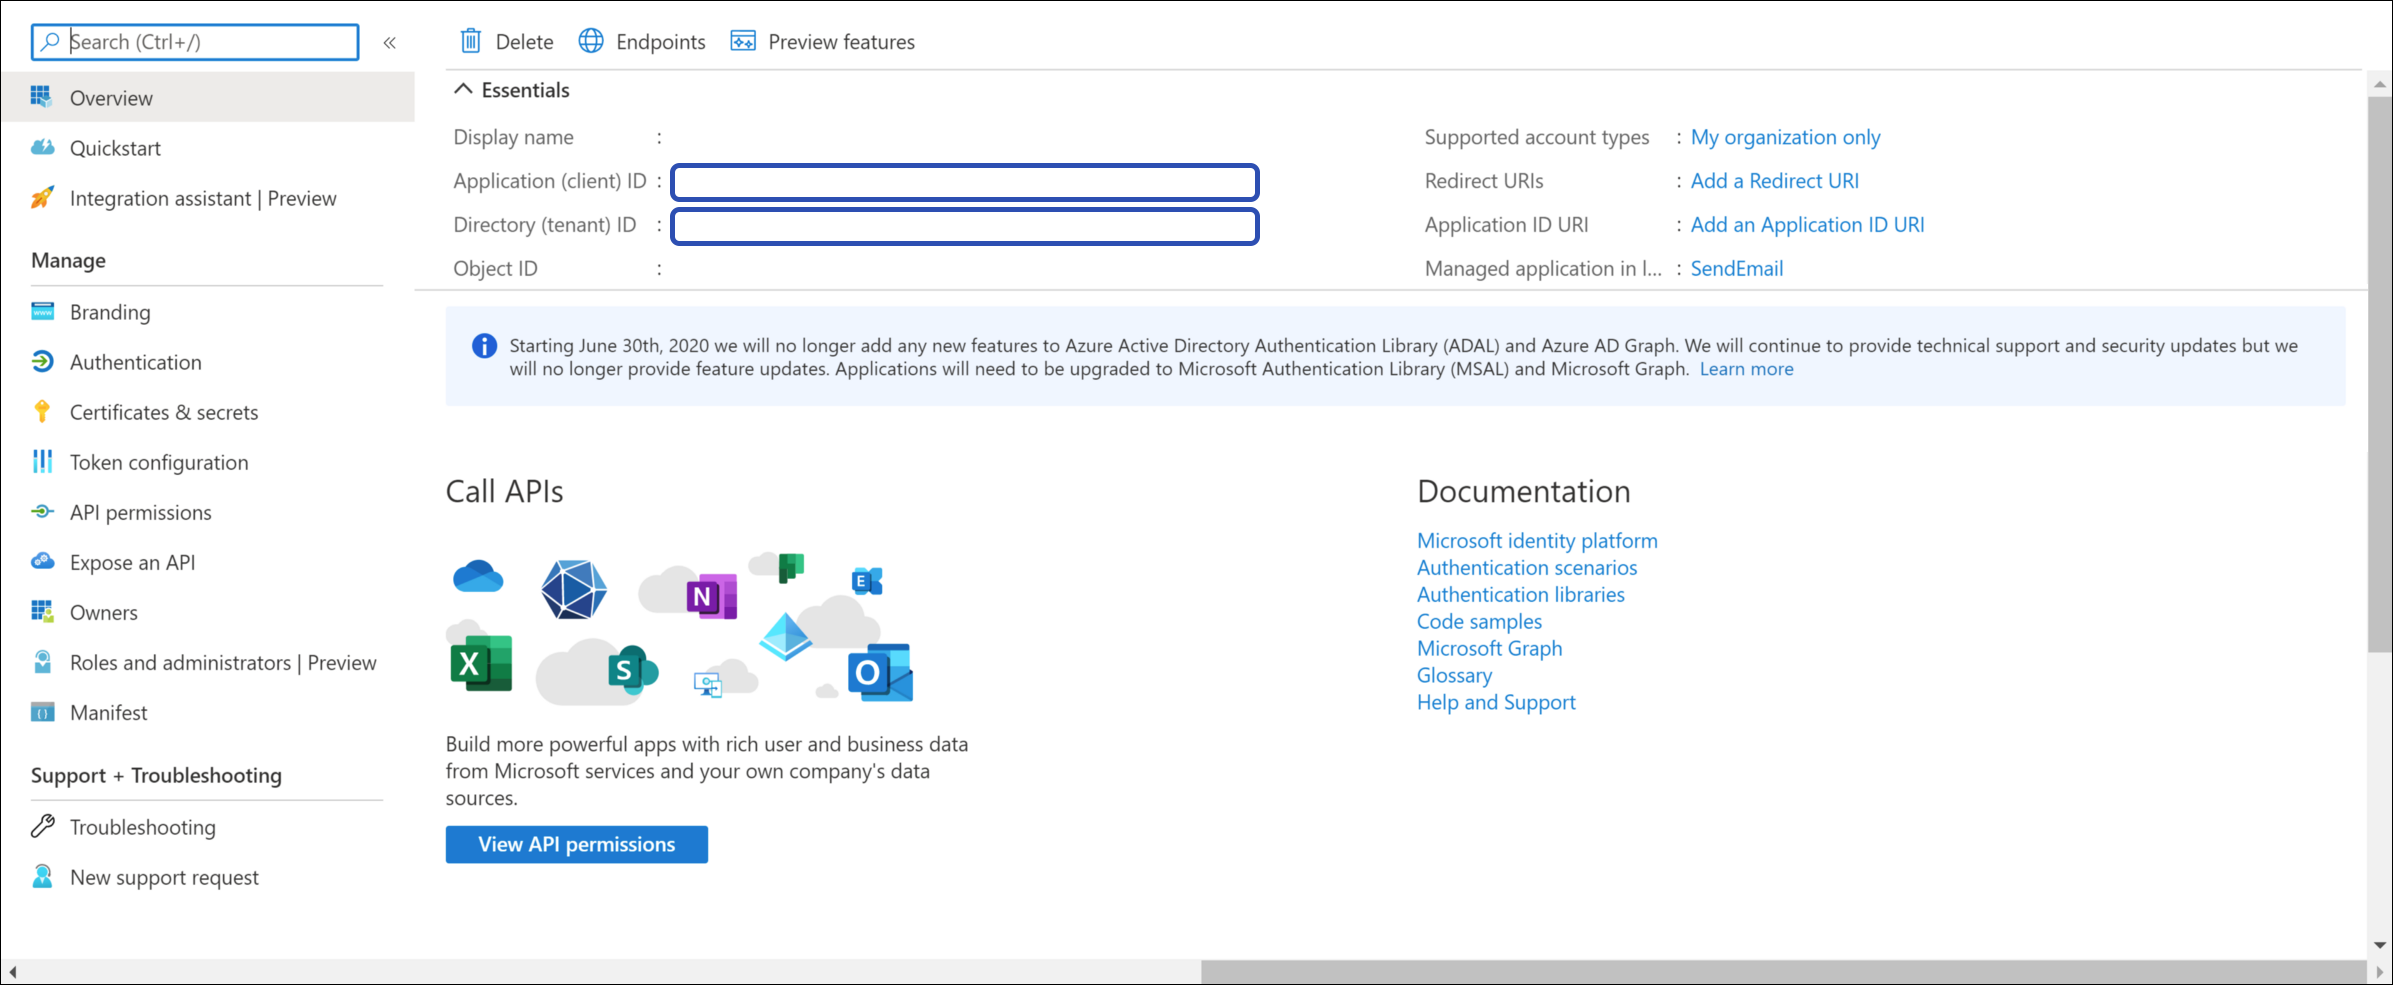
- Make a note of the Application Client ID and Directory Tenant ID as you will require these later on.
- Select Certificates & secrets from the Manage menu on the left.
The 'Certificates & secrets' page is displayed:
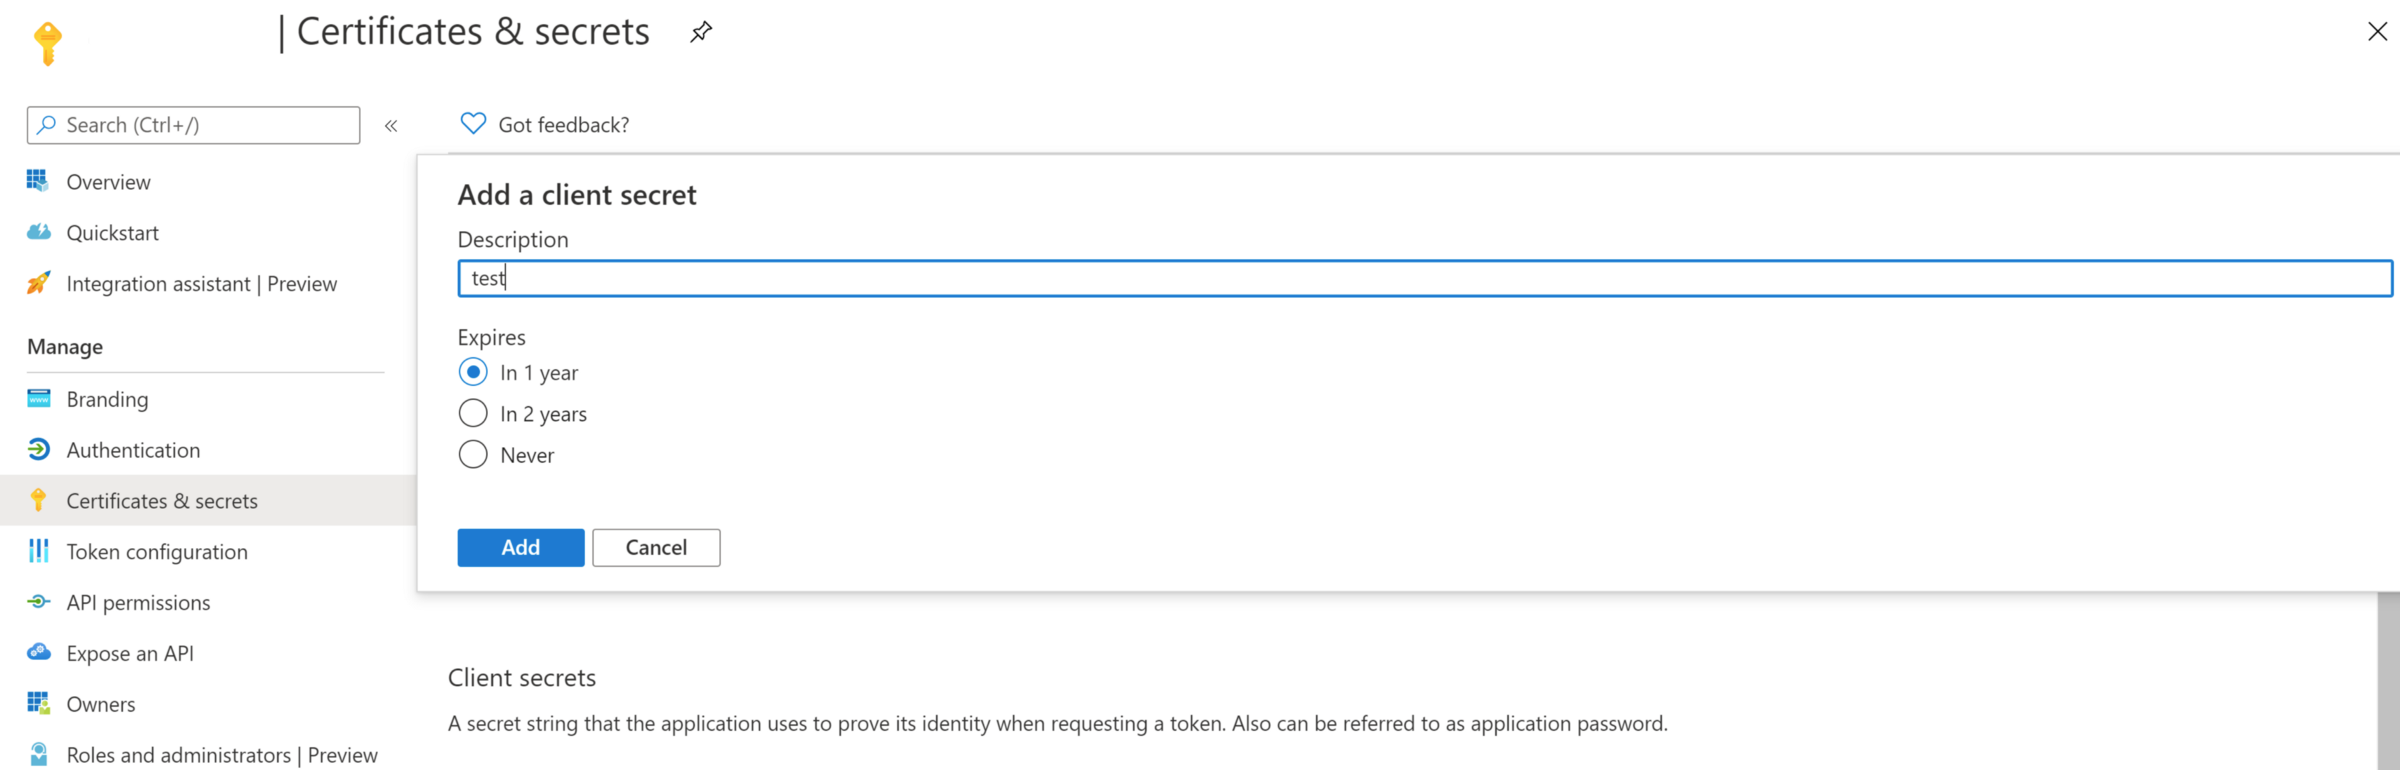
- Create a new client secret by entering a Description, setting the Expires radio button, selecting the Add button.
- Once generated, copy the client secret to a safe place as, once you leave the page, you will not be able to retrieve the secret value again.

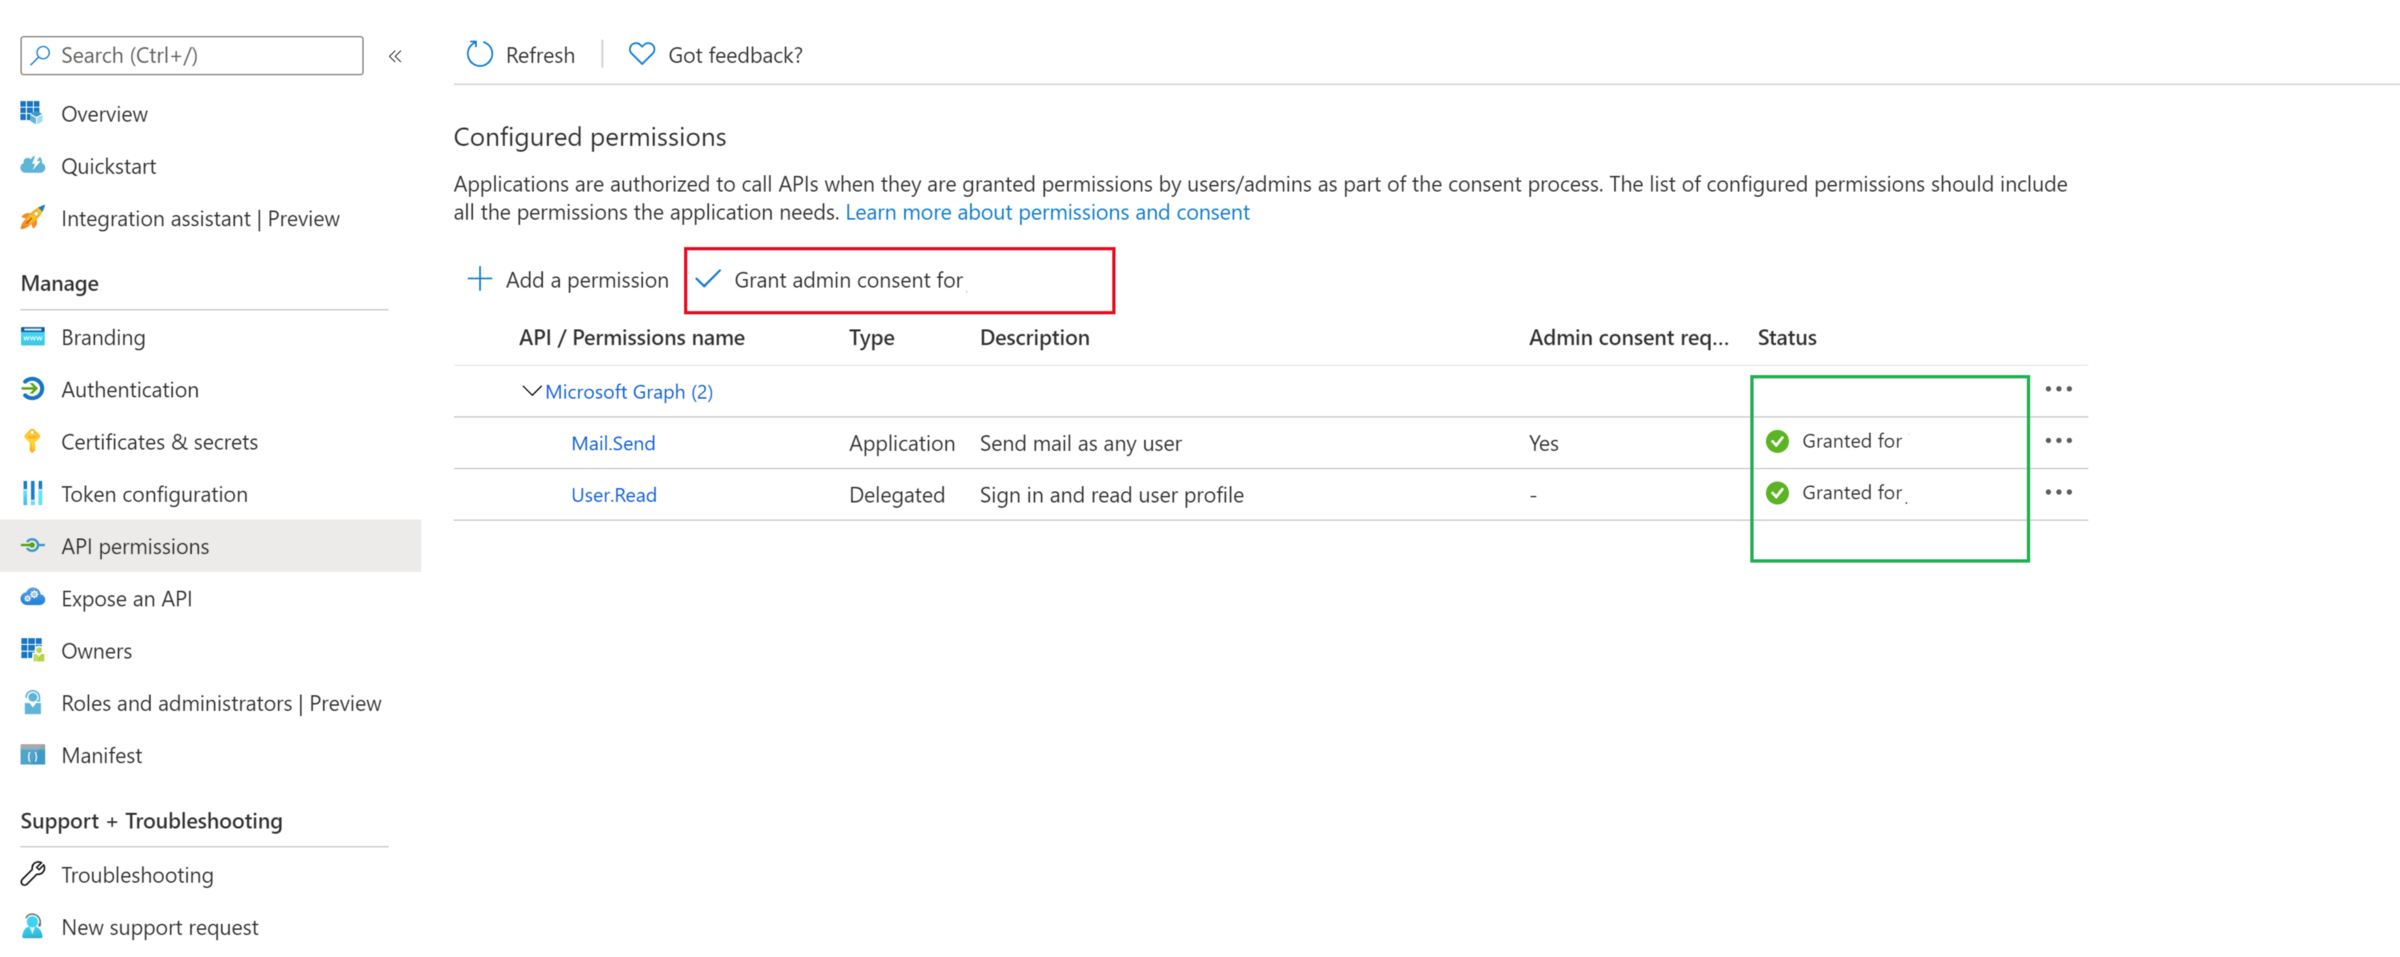
- Select API permissions from the Manage menu on the left.
- Select the Add a Permission button.
The 'Request API permissions' page is displayed:

- Select Microsoft Graph (as highlighted above).
- Select Application Permissions.
- Then search for "Mail", and select the Mail.Send option (see screenshot below).
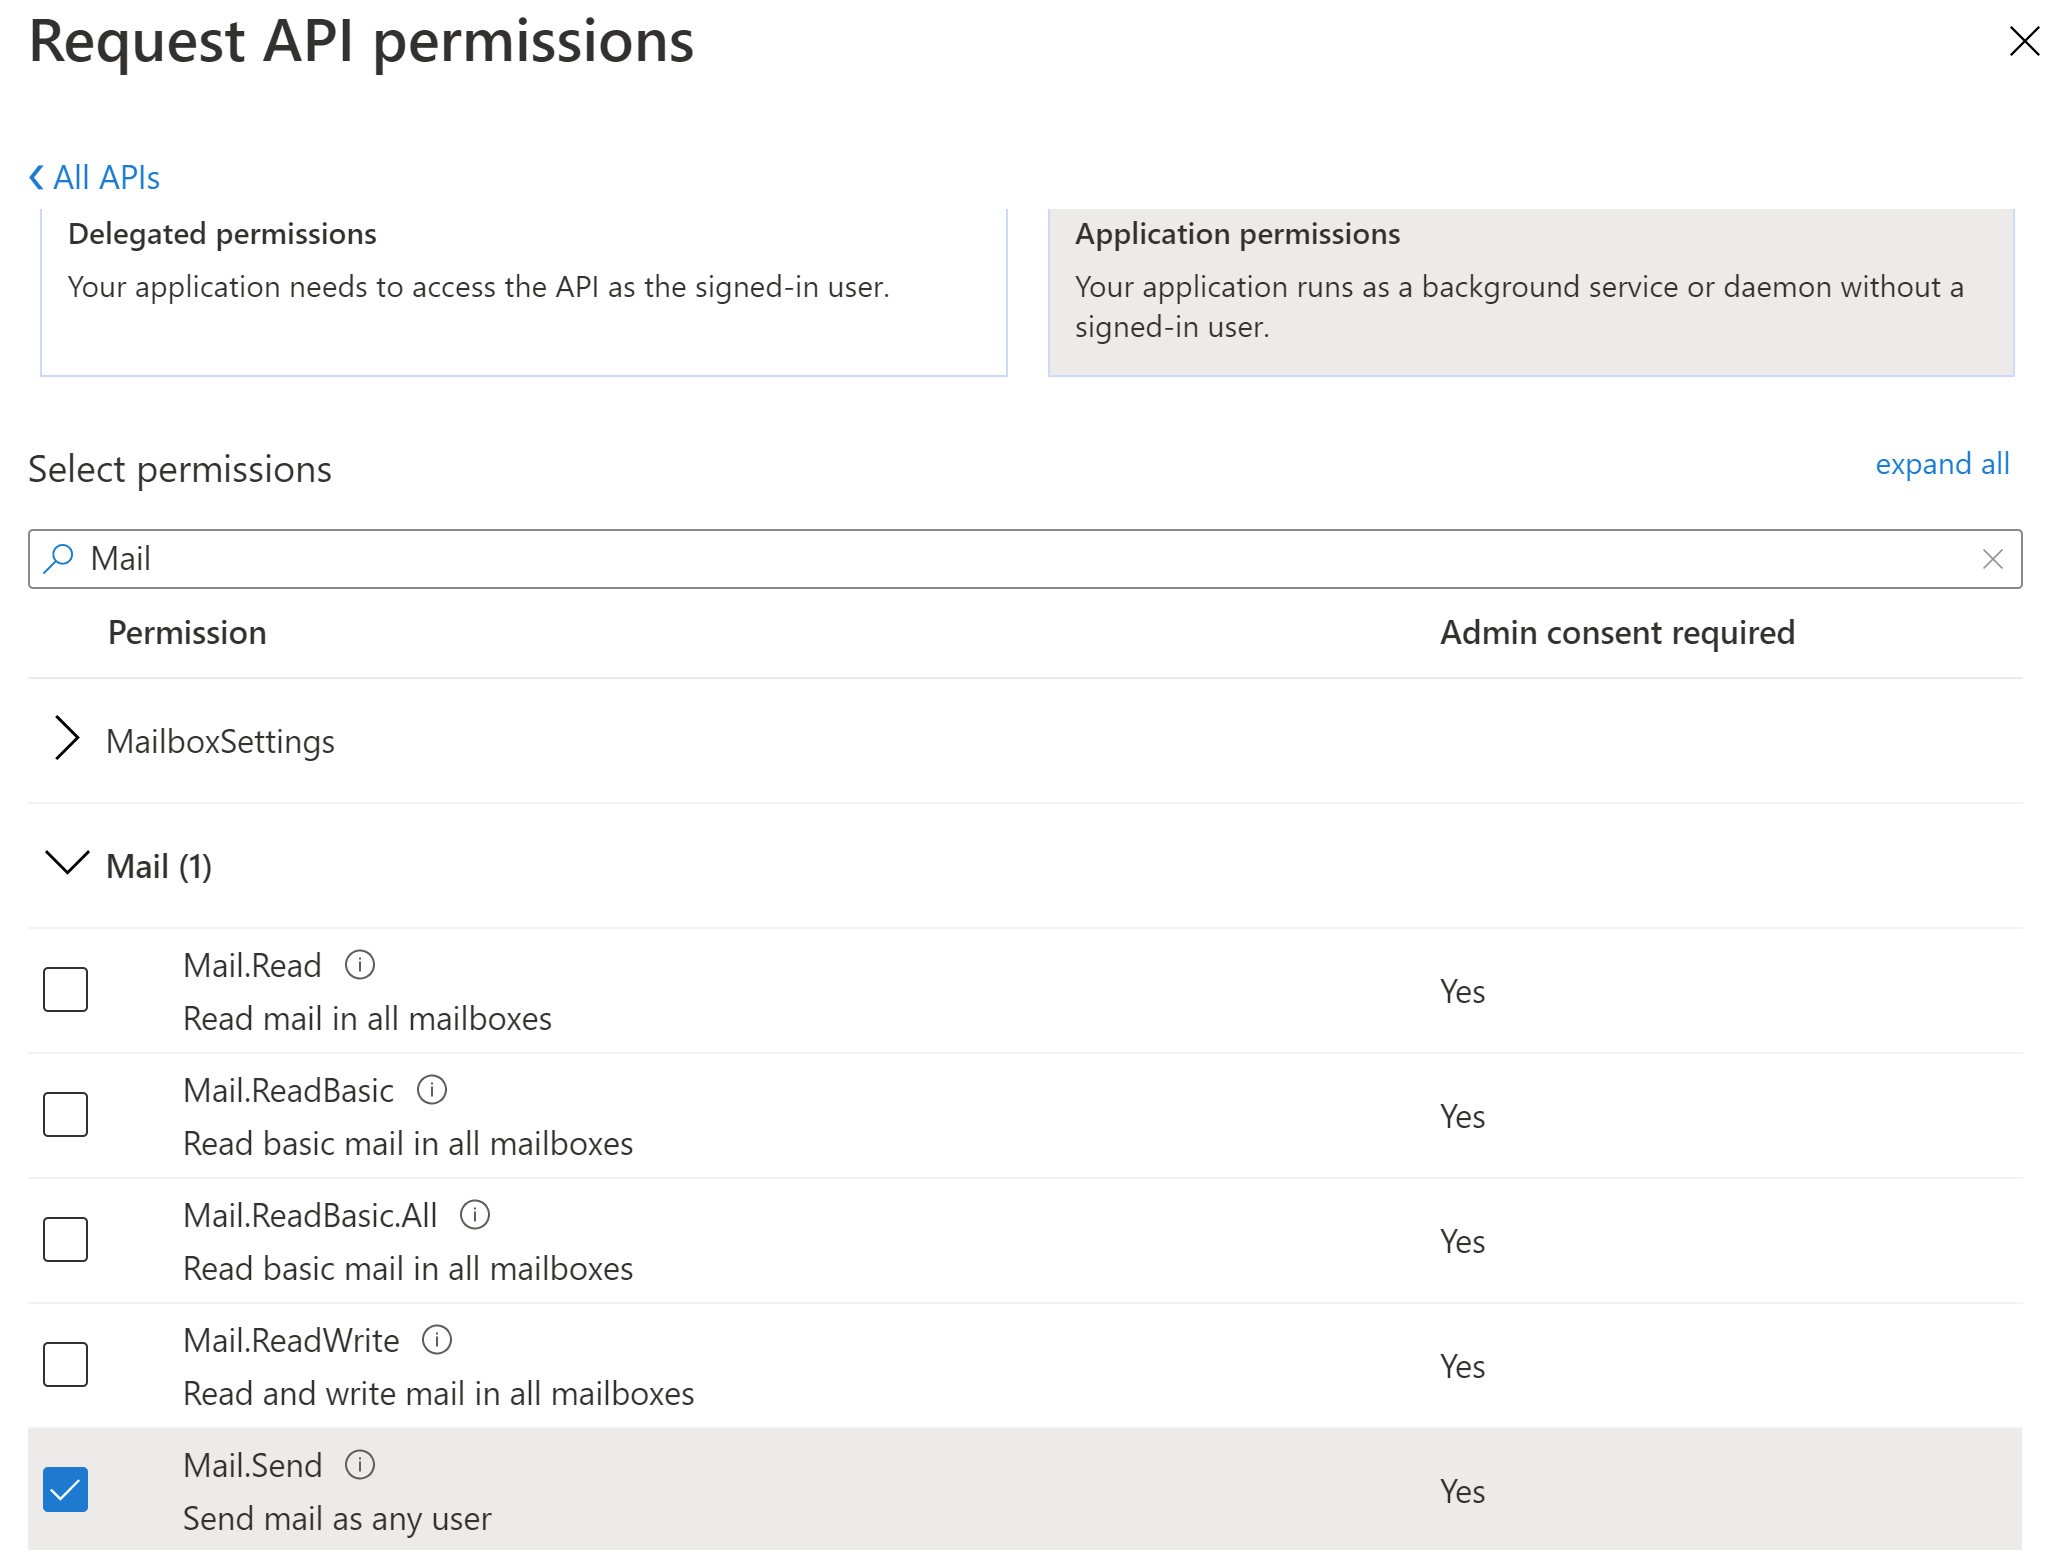
- Select the Add Permissions button to add the permissions to the API.
- Once the permissions are added to the API, select the Grant admin consent for button to grant admin consent so that Care Cloud can have access to the required permissions and emails can be successfully sent from within the app. Make sure you have a green tick against the API, as highlighted below.