Contents
APIs

APIs can be used to access and change data that is within the system. Giving a Person or Company access to your APIs is the same as giving them access to you system - all usual polices and procedures should be followed when considering
API Help
The API Help library can be found in Settings > Customizations > API Routes. This contains information about each API available including sample pay loads, types of calls which can be made and API Definitions for download.
API Routes
API Routes can be seen in Settings > System Management > API Routes. This controls which APIs are available for this Tennant.
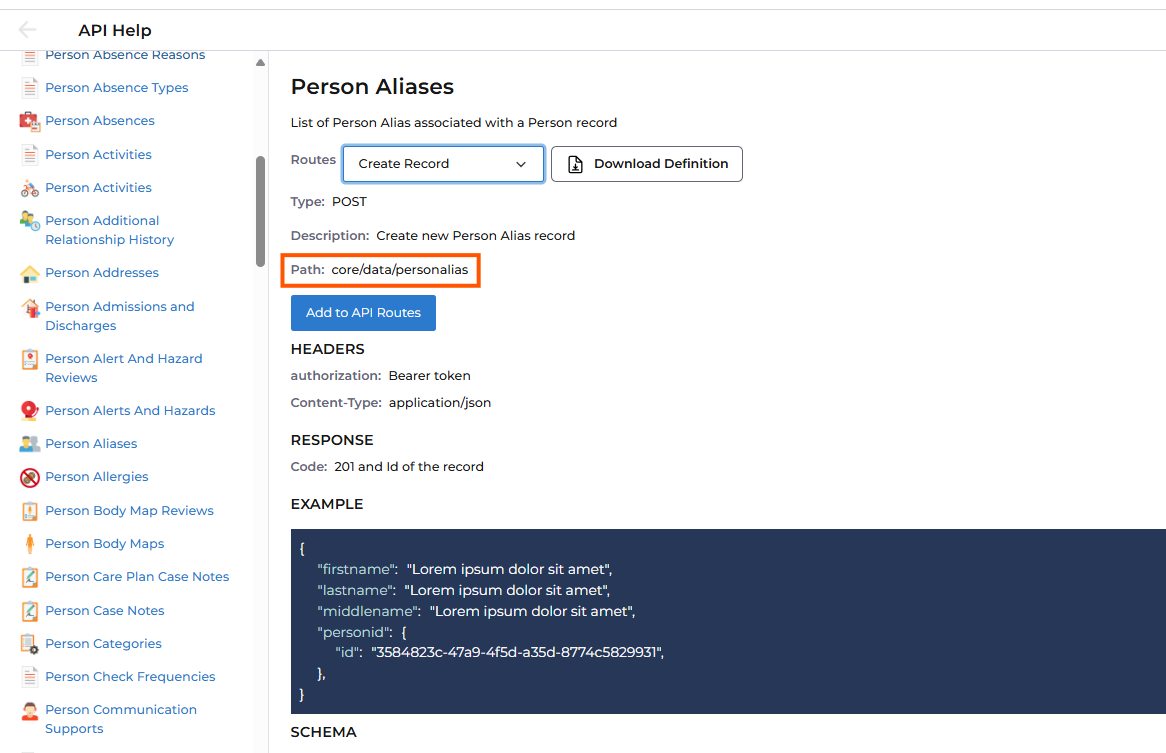
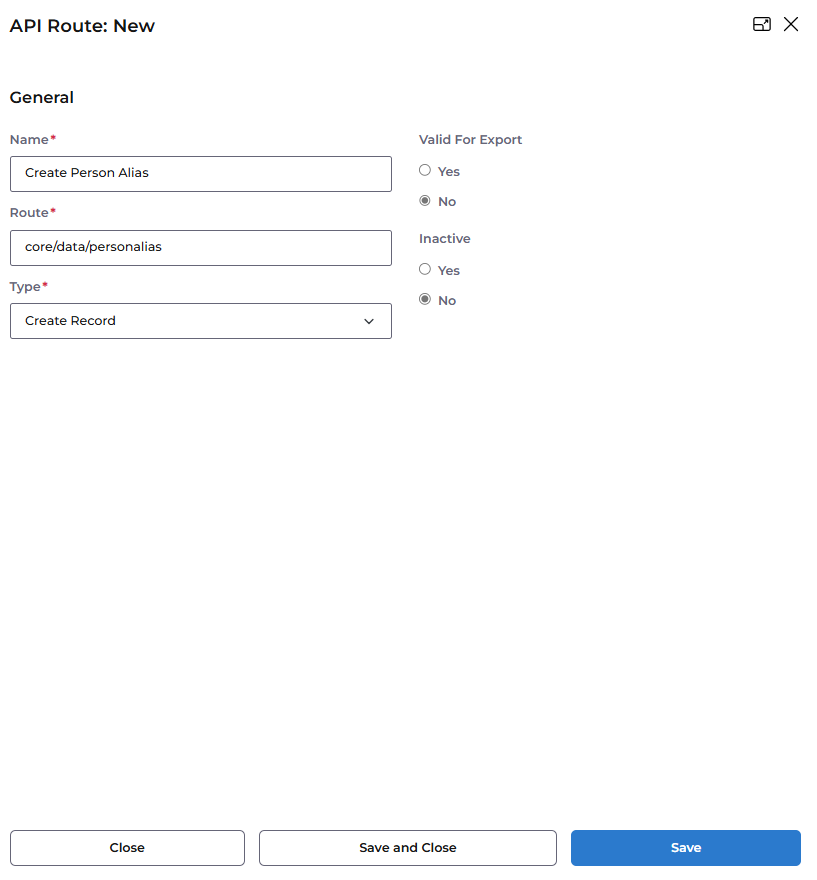
If the API Route required is not already made it can be added either via the API Help using the "Add to API Routes Button" as shown below or manually within API Routes . T do this Choose any 'Name' you would like and the 'Route' must match the 'Path' shown in the API Help.
The 'Path': from API Help and "Add to API Routes" button:
Using the 'Path' to create the API Route:
API Applications
Applications can be found in Settings > System Management > Applications.
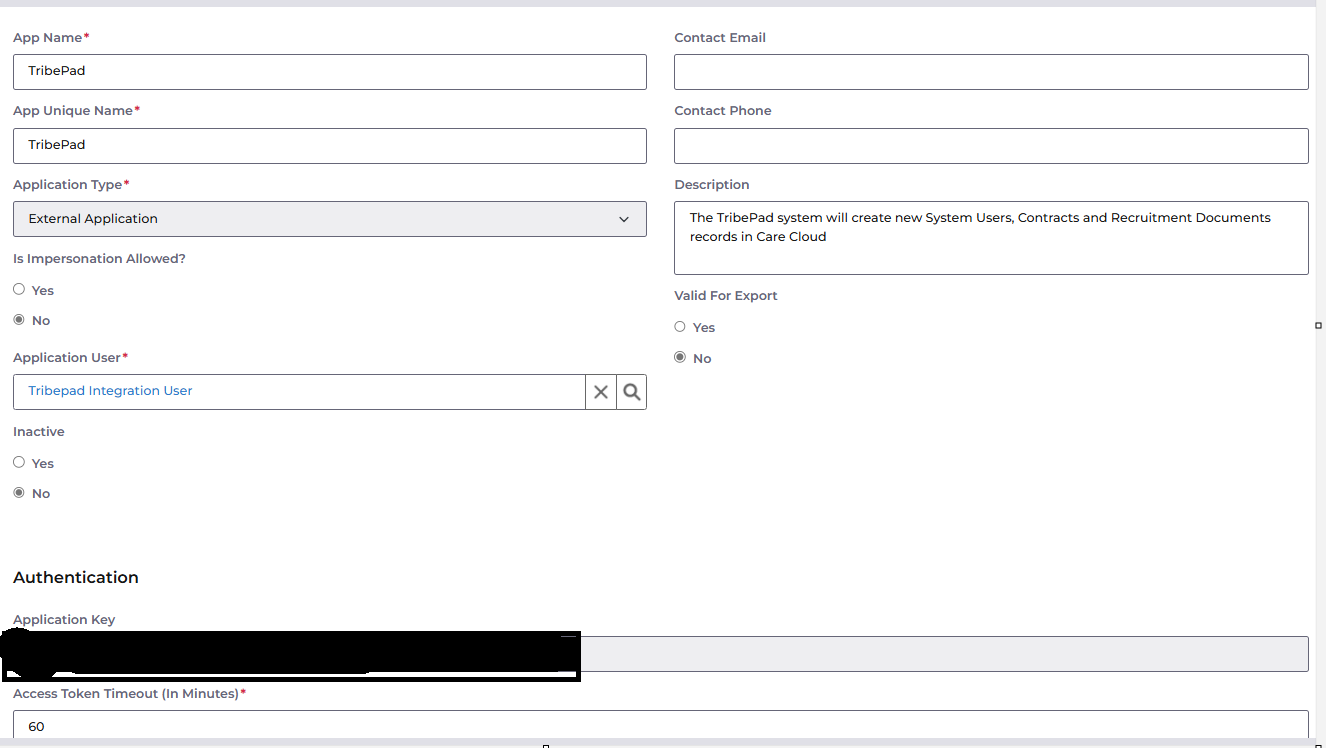
The Applications are used to control the credentials which the API will be using. It is recommended to set up a new Application per System being integrated.
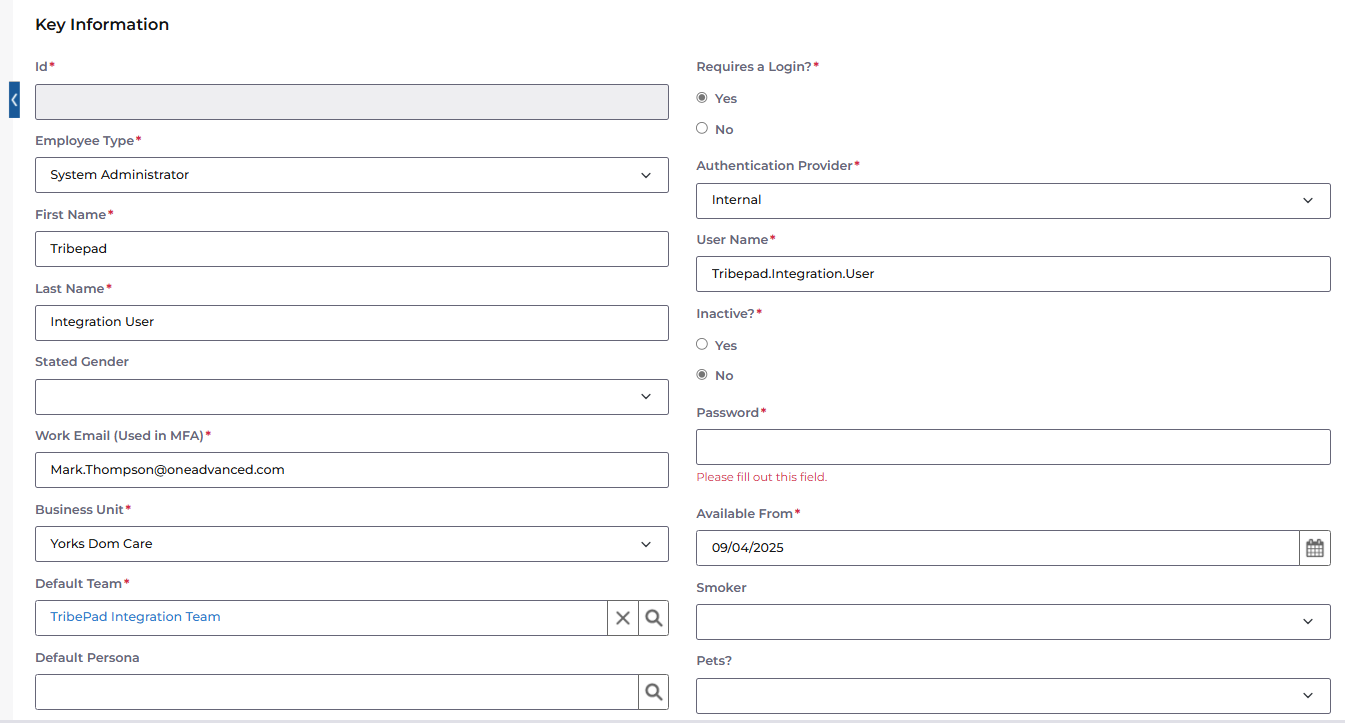
When setting up the Application a 'Application User' has to linked which the Integration will act as when accessing and changing data. This user will be used in the audit and its recommended to set up a new user and team for each Application, as shown in the examples below.
System Users Creation
In this example the System to be integrated is named Tribepad
Application Creation
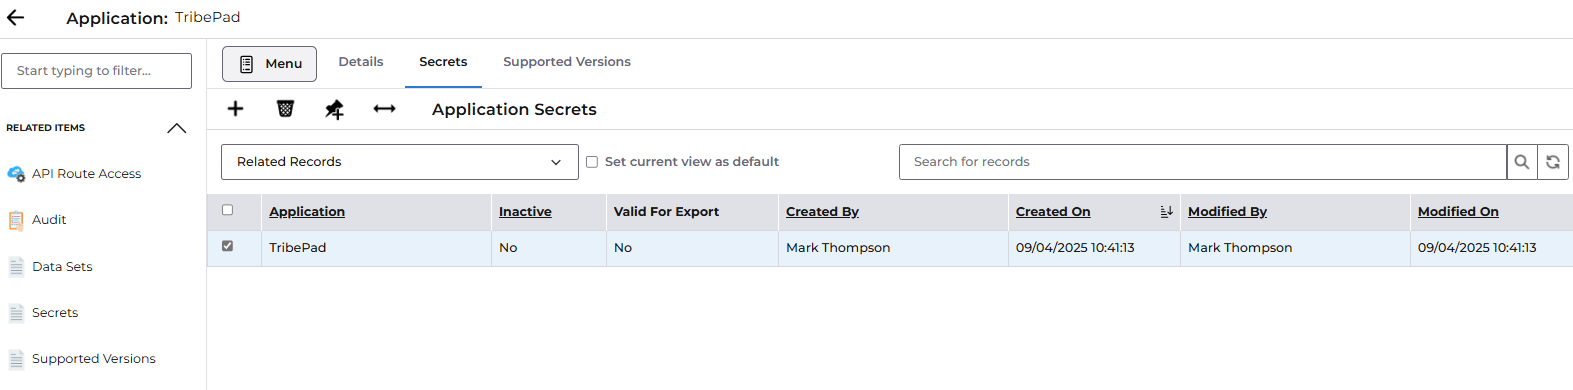
In this example the System to be integrated is named Tribepad. When saved the 'Authentication' key is automatically created. The 'Secrets' must be created by clicking the 'Secrets' tab and the 'Plus' sign. When doing this a Secret Key will appear on screen and will not be shown again. Therefore this must be saved in a secure place for the next step.
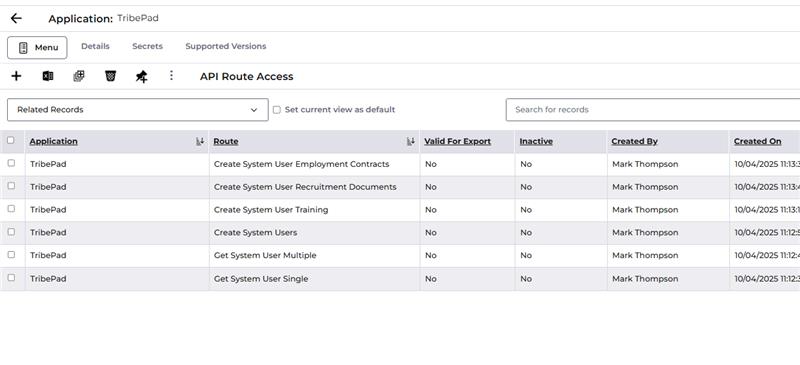
The API Routes must be added to the Application which controls which API Routes are allowed per Application.
Calling the APIs
Using API Applications such as Postman the above information can be used to call the APIs.
Using Postman as an example it requires the following information in the Variables tab:
- Client_Id - from Settings > System Management > Applications > Application Key
- Client_Secret - as described above when setting up the Application
- Auth_ulr - the URL of the System you are connecting to
- Service_url - if connecting to a test environment on Non-Production (controlled by OneAdvanced for development and testing) this will be https://integration-api-qa.advancedcarecloud.oneadvanced.io/api. If connecting to a Production environment (this includes Customer UAT/TEST/PROD/LIVE) this will be https://integration-api.advancedcarecloud.com/api.
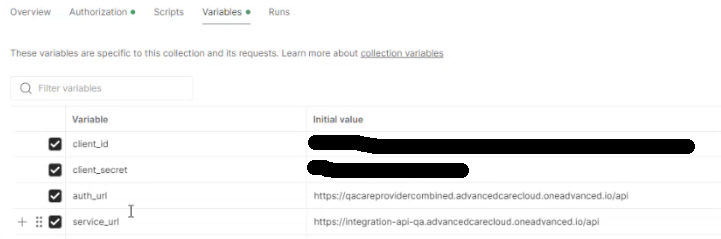
Calls can then be made with the Collections area. In the example below a System User (where Payrollid is 12345) is being retrieved from the system using an API.

Create Records with Pick Lists
Records which contain picklists must be hardcoded in the Integration. To find the pikclist values go to Settings -> Customizations -> Option Sets -> (Find Required Option Set) -> Optionset Values (Menu) > Pick a value from the "Numeric Code" field
Application Exports / Imports
An application can be moved from one Tenant to another to avoid additional manual set up.
To export select the Application and click the export button at the top of the page.
Then in the required Tenant choose the import button and the file downloaded above.
The Application and the API routes will be imported.
Then add the System User and link this to the Application User with the Application and recreate the secret (the same method as earlier in this guide).
Remember to have any required Business Modules for the integration turn on in this Tenant.
Authenticating with CBM API
Before you can call any CBM API endpoint, you must obtain an access token. You do this by sending your application credentials to the authentication endpoint, then include the returned token on every subsequent API request.
Step 1 — Request an access token
Send a POST request to the token endpoint:
POST /api/auth/token
Content-Type: application/x-www-form-urlencoded
client_id=<your application key>|<your tenant id>&client_secret=<your application secret>
Field | Required | Description |
client_id | Yes | Your application key, followed by a | and your tenant/environment ID (e.g. ABC123...|044847B6-3C52-417B-84B5-3AFE439EB2A1) |
client_secret | Yes | Your application secret |
Note: the request body is form-encoded (application/x-www-form-urlencoded), not JSON. AuthController.cs:34-42
If your environment uses tenant-based URLs, you supply just the application key as the client_id and the tenant is taken from the URL you call. You can check which mode your environment uses by calling GET /api/auth/use-tenant-base-url.
Step 2 — Read the response
A successful request returns HTTP 200 with a JSON body:
{
"access_token": "eyJhbGci...",
"token_type": "bearer",
"expires_in": 3600
}
Field | Description |
access_token | The token to use on subsequent API calls |
token_type | Always bearer |
expires_in | Number of seconds until the token expires — request a new one before it does |
If your credentials are invalid you receive an HTTP 400 response containing an error code and error_description.
Step 3 — Call the API with your token
Include the token in the Authorization header of every subsequent request:
Authorization: Bearer <access_token>
When the token expires (after expires_in seconds), simply repeat Step 1 to obtain a new one.
Note — obtaining your client_id and client_secret
Both credentials are generated inside CareDirector, not by the API itself:
- Your application key is created automatically when an Application record is set up in the system. This key forms the first part of your client_id.
- Your application secret comes from an Application Secret — a child record of the Application. When one is created, the system generates a one-off secret value; this is your client_secret.
Keep the secret safe when it is generated, as it is used together with the application key to authenticate.
Retrieving records —
GET api/core/data/{type}
Use this endpoint to retrieve a collection of records of a given business object type. The {type} in the route is the business object name (for example person).
You must include a valid access token (see the authentication guide) on the request as Authorization: Bearer <access_token>.
Request
GET /api/core/data/{type}
Authorization: Bearer <access_token>
Part | Description |
{type} | The business object name whose records you want, e.g. person |
By default the endpoint returns the first page of up to 250 records, with all fields included.
You refine the results using OData-style query string parameters: $top, $skip, $orderby, $select and $filter. These are only applied when the URL contains a ?. DataController.cs:87-106
Paging — $top and $skip
Paging is controlled by two parameters:
Parameter | Meaning | Rules |
$top | The number of records to return (page size) | Must be between 1 and 250. If omitted, defaults to 250. A value of 0, greater than 250, or non-numeric returns an error. |
$skip | The number of records to skip before the page begins | Must be a valid integer. When used, $top must also be supplied. |
Internally, $skip is converted to a page number using (skip / top) + 1, so paging works in whole pages of $top size. If you supply $skip without $top you get the error "With $skip tag you must supply $top tag to calculate page count."
Examples
# First 50 records
GET /api/core/data/person?$top=50
# Second page of 50 records (records 51–100)
GET /api/core/data/person?$top=50&$skip=50
Selecting fields — $select
Restrict the fields returned with a comma-separated list. When omitted, all fields are returned. ODataUriParser.cs:71-78 DataController.cs:100-105
GET /api/core/data/person?$select=firstname,lastname,dateofbirth
Sorting — $orderby
Sort with a comma-separated list of fields, each optionally followed by asc (default) or desc. ODataUriParser.cs:80-99
GET /api/core/data/person?$orderby=lastname asc,firstname desc
Filtering — $filter
The $filter parameter lets you restrict results by field values.
Supported comparison operators
Operator | Meaning |
eq | Equal |
ne | Not equal |
gt | Greater than |
ge | Greater than or equal |
lt | Less than |
le | Less than or equal |
Combining conditions:
Multiple conditions are joined with and only. or is not supported. All conditions are combined with logical AND.
Value formatting rules
- Text values must be wrapped in single quotes, e.g. firstname eq 'John'. A missing quote on either side produces an error.
- Numbers, decimals, booleans and dates are not quoted. The value type is detected automatically — dates (e.g. 2022-12-21T03:46:53Z), integers, decimals and true/false are recognised without quotes.
- A single quote inside a text value must be escaped by doubling it, e.g. lastname eq 'fan''dango' matches fan'dango. An un-escaped quote produces an "Invalid term" error.
- Semicolons (;) are forbidden anywhere in the filter and cause a "Filter syntax error. Unsupported characters found." error.
- Using an unsupported operator (e.g. =) returns "Filter syntax error. Invalid condition operator for '{field}'."
Filter examples
# Text match
GET /api/core/data/person?$filter=lastname eq 'Smith'
# Multiple conditions (AND)
GET /api/core/data/person?$filter=firstname eq 'John' and lastname eq 'Smith'
# Numeric / date comparison
GET /api/core/data/person?$filter=dateofbirth ge 2000-01-01T00:00:00Z
# Text value containing an apostrophe (doubled to escape)
GET /api/core/data/person?$filter=lastname eq 'O''Brien'
Combining everything
All parameters can be combined in a single request:
GET /api/core/data/person?$top=2&$skip=20&$filter=firstname eq 'John' and lastname eq 'Smith'&$select=firstname,lastname&$orderby=lastname
This is the exact shape exercised by the unit tests, confirming $top, $skip, $filter, $select and $orderby are all honoured together.
Related endpoints on the same controller (for context)
The same DataController also exposes: a single-record fetch GET api/core/data/{type}/{id}, related-record routes such as GET api/core/data/{type}/{id}/{relatedName}, view-based routes (.../system-view/{viewName} and .../user-view/{viewName}), and create/update/delete via POST, PUT/PATCH and DELETE. The view-based and related-record routes also support $top, $skip and $filter.
Creating an API Route/endpoint from an Advanced Search/User View
1. Create and Save Advanced Search (if not created already). This will be created as a 'User View'
2. Go to: Settings -> Views and Dashboards -> User Advanced Searches
3. Find and open the User View/Advanced Search that has been created above
4. Populate the Api Route field with a name that will be used in the api url (allocated-beds, for example). Save record.
5. Go to: Settings -> Configuration -> System Management -> API Routes
6. Create new API Route. Select an appropriate Name Populate Route with something like: core/data/personcontractserviceroomallocation/user-view/allocated-beds (as an example) The format is: core/data/{0}/user-view/{1} where: {0} is the name of the business object (this could person, systemuser or personcontractserviceroomallocation). this would be the main business object of the user view created above {1} is the name of the api ropute that was populated into the Api Route field of the User View/Advanced Search record Type should be set to 'Get Multiple Records'
7. Go to: Settings -> Configuration -> System Management -> Applications
8. Find and open the application record you are using to connect to the CBM APIs
9. In the Menu of the Application record click 'API Route Access'
10. Click the plus to create a 'API Route Access' record. Populate the Route field with the newly created API Route record
11. Now you should be able to connect to the CBM APIs using the url that was created in the API Route above, something like: /core/data/personcontractserviceroomallocation/user-view/allocated-beds (as an example)
12. You can change the columns returned and the filtering through the Advanced Search View configuration
